Best Label Maker for Home Office Organization in 2026
Introduction
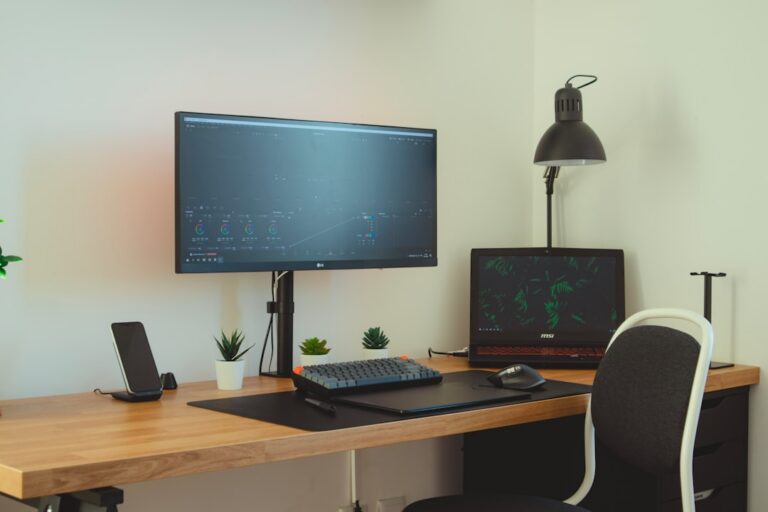
Picture this: You're on a video call with a client, and they need the contract you finalized last week. You know it's in one of those white storage boxes under your desk—but which one? Five minutes of awkward silence later, you're still rifling through unlabeled containers while apologizing profusely. Or maybe you've dealt with the cable nightmare—a dozen identical black cords snaking behind your desk, and you have no idea which one powers your monitor versus your laptop.
If either scenario sounds painfully familiar, you're not alone. I've tested hundreds of home office products, and I can tell you that the humble label maker is one of the most underrated tools for transforming a chaotic workspace into something actually functional. It's not just about aesthetics (though clean, uniform labels do look remarkably professional). It's about reclaiming the mental energy you waste searching for things and second-guessing where items belong.
A quality label maker turns your organizational system from theoretical to practical. Those carefully planned filing categories? They actually work when labeled. That box of miscellaneous cables? Suddenly manageable when each one is tagged. The supply drawer that everyone (including you) ignores? It becomes usable when contents are clearly marked. The difference between an organized space and an actually organized space often comes down to visible, durable labels.
What This Guide Covers
In this comprehensive guide, I'll walk you through everything you need to know about choosing and using a label maker for home office organization:
- Types of label makers: From basic handheld models to Bluetooth-enabled smart devices and even smartphone-based options
- Essential features: Print quality, label width options, battery life, connectivity, and software capabilities that actually matter
- Practical organization strategies: Specific ways to use labels for file systems, storage solutions, cable management, and inventory tracking
- Real-world recommendations: What works for different budgets, usage levels, and organizational challenges

Check Price on Amazon →
Who Really Benefits?
While anyone with a home office can benefit from better labeling, certain groups will see immediate returns:
Remote workers dealing with the hybrid life need to keep personal and professional items separated and easily accessible. When you're switching between work mode and home mode daily, clear labels eliminate confusion.
Small business owners and freelancers often juggle multiple clients or projects simultaneously. Labeled filing systems, storage bins, and supply organization prevent costly mix-ups and wasted time.
Students and researchers managing multiple courses, papers, or research projects need robust organizational systems that won't fall apart mid-semester.
Anyone returning to their desk after time away will appreciate how labels refresh your memory instantly—no more "what's in this folder?" moments.
The bottom line: If you've ever spent more than 30 seconds searching for something in your own workspace, you need a label maker. Let's find you the right one.
Why Every Home Office Needs a Label Maker
I'll be honest—I resisted label makers for years. They seemed fussy and unnecessary, something only type-A personalities would obsess over. Then I spent 20 minutes searching for a specific USB-C cable during a client call, and everything changed.
A label maker isn't just about making things look neat (though that's a nice bonus). It's about eliminating the micro-frustrations that chip away at your productivity every single day. When you're not hunting for the right cable, wondering which box has last quarter's files, or debating whether that charger belongs to your laptop or your wife's tablet, you free up mental bandwidth for actual work.
The Psychology of Labeled Spaces
Our brains are constantly processing visual information and making decisions. Every unlabeled drawer, unmarked cable, or mystery box adds a tiny cognitive tax. "Should I check this one? What about that one? Where did I put that thing again?"
This mental clutter creates decision fatigue—the same phenomenon that makes it harder to focus as your day progresses. Labels eliminate those micro-decisions. You simply read and act. Research on visual organization shows that clear labeling can reduce search time by up to 70%, but the real benefit goes deeper than time savings.
When your space is clearly labeled, your brain registers it as "organized" on a subconscious level. This actually reduces stress hormones and improves focus. It's why professional organizing services emphasize labeling as a cornerstone of sustainable organization systems—it's not about perfection, it's about reducing cognitive friction.
Plus, labels create accountability for everyone who shares your space. When the drawer clearly says "USB Cables—Phone" and another says "USB Cables—Computer," your family members can actually return things to the right spot. Without labels, they're guessing, and guessing leads to chaos.
Check Price on Amazon →
ROI: Time Savings and Productivity Gains
Let's talk numbers. If you spend just 10 minutes a day looking for things—and most people spend more—that's nearly an hour per week. Over a year, that's 43 hours of productive time lost to searching.
Compare that to a decent label maker, which costs about the same as two hours of a professional organizer's time but delivers benefits indefinitely. I've labeled everything from file boxes to drawer dividers to the various

Check Price on Amazon →
ports on my desk (because yes, I forget which one is data-only versus power delivery).
The professional appearance matters too, especially if clients see your workspace on video calls. Neatly labeled storage boxes and organized shelves signal competence and attention to detail. It's a subtle credibility boost that costs pennies per label.
The biggest ROI isn't even measurable in dollars—it's the mental relief of never wondering "where did I put that?" again. Your organization system becomes self-maintaining because everyone (including future-you) knows exactly where things belong.
Types of Label Makers for Home Office Use
Once you dive into the world of label makers, you'll quickly realize there's way more variety than those clunky handheld devices from the '90s. Modern label makers range from pocket-sized portables to desktop powerhouses that rival some printers. Let me break down what's available so you can find the right match for your home office.
Handheld Label Makers
These are the workhorses most people picture when they think "label maker." Battery-powered and compact enough to toss in a drawer, handheld models are perfect if you need basic text labels for files, storage boxes, or organizing your
Check Price on Amazon →
situation.
The interface is straightforward—a small LCD screen and a QWERTY keyboard (though cramped). You type your label, choose a font size, maybe add a border, and print. That's it. Most use thermal printing technology, which means no ink cartridges to replace—just snap in label tape and you're good to go.
The downside? Limited design options and tedious typing on those tiny keys. But if you're labeling 10-20 items per session and don't need fancy graphics, handhelds get the job done for $20-50.
Desktop and Computer-Connected Models
Step up to desktop models and you're entering serious labeling territory. These larger units sit permanently on your workspace with full-sized keyboards that make typing actually pleasant. They typically offer wider tape options (up to 24mm vs. 12mm for most handhelds), more fonts, and the ability to save frequently-used labels.
Computer-connected label makers take this further by letting you design labels directly on your PC or Mac. You get access to hundreds of fonts, import graphics and logos, and create multi-line labels with precise formatting. The label maker connects via USB and functions like a specialized printer. This is the route I'd recommend if you're setting up an elaborate filing system or need consistent, professional-looking labels across your entire office setup.
The thermal printing tech in these models is incredibly reliable—I've had units run for years without issues. Just watch your tape costs; they can add up with heavy use.
Smart Label Makers with App Integration
Bluetooth-enabled label makers are game-changers if you're already living on your smartphone. Download the companion app, design your label with your phone's full color display and touchscreen keyboard, then send it to print wirelessly.
The apps usually include templates for common uses (file folders, address labels, pantry jars), clipart libraries, and even the ability to create QR code labels that link to digital information. Some can pull contacts directly from your phone or add dates with a single tap. It's genuinely faster and more intuitive than pecking away on physical keyboards.
Specialty Label Makers for Specific Tasks
Beyond general-purpose models, you'll find label makers designed for specific jobs. Cable label makers print on flexible or wrap-around tape perfect for organizing the rat's nest behind your

Check Price on Amazon →
. Others specialize in creating folder tabs, name badges, or color-coded labels for complex filing systems.
Some higher-end models can switch between different tape widths automatically, letting you print narrow labels for cables and wide labels for binders without swapping cartridges. These multi-format options cost more upfront but save time if your organizational needs vary.
The key is matching the tool to your actual labeling habits—not just what sounds cool in theory.
Essential Features to Consider Before Buying
Shopping for a label maker can feel overwhelming when you're staring at dozens of options ranging from $20 impulse buys to professional units costing $150 or more. After testing countless models across my home office setups, I've learned which features actually matter in daily use versus what's just marketing fluff.
Print Quality and Tape Options
The most crucial spec is print width capacity. Budget models typically max out at 1/4 or 3/8 inch tape—fine for labeling cables or small containers. But if you're creating shelf labels, file folder tabs, or anything visible from a distance, you'll want a machine that handles 1/2 to 1 inch tape. I keep both sizes stocked because sometimes a tiny label is perfect, other times you need that visual impact.
Tape variety compatibility separates the mediocre from the truly useful. Standard plastic tape works for most jobs, but having access to clear tape (for labeling over text), metallic options (for a polished look), durable outdoor-rated tape, and even iron-on fabric tape transforms your label maker into a versatile organizational tool. Check what tape ecosystem you're buying into—some manufacturers offer 20+ varieties, others just basic colors.
Font options matter more than you'd think. The ability to adjust sizes, switch between different typefaces, and access symbol libraries (arrows, icons, borders) means your labels look professional rather than utilitarian. I particularly appreciate models with built-in templates for common uses like file folders or network ports.
Ease of Use and Interface Design
Here's where many people make buying mistakes: they underestimate how annoying a bad interface becomes. Keyboard layout is surprisingly important. ABC layouts might seem intuitive, but if you're typing anything longer than "Paper Clips," a QWERTY keyboard is significantly faster. Trust me on this—those extra seconds add up when you're labeling 50 storage bins.
A backlit LCD display is non-negotiable in my book. Being able to preview your label, see formatting, and catch typos before printing saves tape and frustration. Models without displays are basically flying blind.
Memory functions for saving frequently used labels are genuinely useful if you're maintaining an organized system long-term. I have saved labels for things like "Q1 Tax Documents" and "HDMI – Projector" that I reprint annually or when replacing cables.
Check Price on Amazon →
Durability and Build Quality
The cutting mechanism deserves attention. Manual cutters require you to press or slide after each print. Automatic cutters do it for you, which feels luxurious when making multiple labels. More importantly, check reviews for cutting quality—ragged edges look unprofessional and can peel prematurely.
Power options affect long-term costs and convenience. AA batteries are universal but expensive over time. Rechargeable batteries are ideal for portability. AC adapters make sense for desk-bound use. Some higher-end models offer all three, which is genuinely practical.
Budget vs. Features Trade-offs
The $20-40 range gets you basic functionality with limited tape widths and minimal features. The $50-80 sweet spot delivers QWERTY keyboards, decent displays, and broader tape compatibility. Above $100, you're paying for automatic cutting, PC connectivity, larger displays, and professional-grade build quality.
For most home offices, the middle tier hits the right balance. Unless you're labeling extensively for a business, those premium features rarely justify the cost difference.
Best Label Maker Categories for Different Home Office Needs
Finding the right label maker depends on how you actually work. Someone printing occasional file folder labels has completely different needs than a home business owner organizing inventory daily. Here's how to match your workflow to the right machine.
Best overall for most home offices goes to mid-range thermal label makers with built-in keyboards. These typically cost $40-60 and handle everything from cable labels behind your desk to organizing storage drawers. They offer multiple font sizes, basic symbols, and can print on various tape widths. The sweet spot is models that accept 6-12mm tapes—narrow enough for small items but wide enough for file folders.
Best budget option lives in the $20-30 range with handheld embossing label makers. While they seem old-school, these mechanical devices are genuinely reliable. They don't need batteries or charging, and the raised text actually lasts longer than some thermal prints. The trade-off? Limited font options and more hand fatigue during heavy labeling sessions. Perfect if you're organizing a single project rather than maintaining an ongoing system.
Best for tech enthusiasts are smartphone-connected models in the $80-120 range. These Bluetooth-enabled label makers let you design labels with custom fonts, logos, and even emojis through apps. The real advantage is accessing your full photo library for visual organization—particularly useful if you've got labeled bins in a cable management system. The downside is slower printing speeds and dependence on your phone's battery.
Best for minimalist offices are compact thermal models without built-in displays, controlled entirely through apps. They're about the size of a tape dispenser and usually come in neutral colors that don't scream "office equipment." These typically cost $50-80 and work brilliantly for people who label occasionally but want quality results. The streamlined design means fewer buttons to learn and less desk clutter.
Best for heavy labeling projects are desktop thermal printers designed for continuous use. These $80-150+ machines print significantly faster, accept wider tape cartridges, and often include automatic cutters. If you're organizing an entire home office renovation or running a small business, the time savings justify the investment. Look for models that handle 24mm tape and offer tape variety—from clear to metallic finishes.
Best for shared family workspaces needs simplicity above all. Look for label makers with intuitive interfaces, large buttons, and minimal setup. Some mid-range models ($40-60) include preset templates like "School Supplies" or "Kitchen" that make it easy for anyone in the household to create consistent labels. Battery-powered options eliminate cord frustration when multiple people want to use it in different rooms.
Entry-Level Label Makers ($20-40)
These cover basic home office organization without breaking the bank. Expect limited tape width options, basic fonts, and manual cutting. Ideal for labeling file folders, storage boxes, and pantry items.
Mid-Range Options ($40-80)
The sweet spot for most home offices. You'll get multiple font styles, various tape widths, memory for frequently-used labels, and better ergonomics. Many include backlighting and larger displays.
Premium Smart Label Makers ($80-150+)
Justify the cost if you need custom graphics, faster printing, or extensive labeling projects. Smartphone integration, rechargeable batteries, and professional-looking output are standard at this tier.
Creative Ways to Use Your Label Maker for Home Office Organization
Once you've got a label maker in your hands, you'll wonder how you ever managed without one. I've tested these devices across countless home office setups, and the difference between a cluttered workspace and an organized one often comes down to strategic labeling. Let me walk you through the most impactful ways to put your label maker to work.
Cable and Tech Organization
Cable chaos is the number one problem I hear about from remote workers. Start by labeling both ends of every cable—trust me, you'll thank yourself when you're behind your desk trying to figure out which power cord goes where. Label your power strip outlets with device names ("Monitor," "Laptop Charger," "Desk Lamp") so you never accidentally unplug the wrong thing during a video call.
Check Price on Amazon →
I also label all the ports on my docking station and hubs. A simple "Printer," "External Drive," or "Phone" label saves countless minutes of trial-and-error plugging. For networking equipment, label both the router ports and the corresponding cable ends—this is a game-changer when troubleshooting connectivity issues.
Document and File Management
Physical files aren't dead yet, despite what the paperless office evangelists say. Use your label maker to create consistent filing categories with dates for easy retrieval. I format mine as "Category – Project Name – YYYY-MM" for anything time-sensitive. For ongoing reference materials, simple category labels work best: "Tax Docs," "Client Contracts," "Product Manuals."
Pro tip: Add archive dates to files you need to keep but rarely access. "Review After: 2025-12" tells you exactly when to audit that box.
Storage and Supply Organization
Every drawer, bin, and box in your office should tell you what's inside without opening it. Label your desk drawer dividers with supply categories—"Writing Tools," "Clips & Fasteners," "Batteries"—so you can grab what you need in seconds.

Check Price on Amazon →
For storage bins on shelves, include contents and the last update date. "Office Supplies – Restocked 11/2024" helps you track when items need replenishing. I use temporary labels for active project supplies and permanent labels for established organizational systems. This flexibility prevents label overload while maintaining structure.
Asset Tracking and Inventory
Here's where your label maker becomes a legitimate business tool. Create labels for all equipment with serial numbers, purchase dates, and warranty expiration dates. Stick them somewhere accessible but discrete—I use the bottom of monitors and the back of peripherals.
For serious organization enthusiasts with advanced label makers, QR code labels are brilliant. Generate a QR code that links to a digital document with full specs, receipts, and manuals. Scan it with your phone whenever you need details.
Consider color-coding your labels by department or priority level. I use clear tape for permanent labels, white for general organization, and colored tapes for temporary projects or priority items. This visual system makes it instantly obvious what belongs where—and what's just passing through your workspace.
Label Maker Maintenance and Best Practices
Device Care and Maintenance
Your label maker is only as good as the care you give it. I've seen plenty of perfectly functional devices become paperweights because of simple neglect.
Tape cartridge storage matters more than you'd think. Heat and humidity are the enemies here. Store unused cartridges in a cool, dry place—I keep mine in a
Check Price on Amazon →
away from windows. If you notice labels peeling off immediately after printing, your adhesive has likely degraded from poor storage conditions.
For print head cleaning, most label makers will tell you when it's time, but don't wait for an error message. If you're seeing faint streaks or inconsistent printing, grab a cotton swab with isopropyl alcohol and gently clean the print head. Do this every few months if you're a heavy user, or twice a year for occasional labeling projects. It takes 30 seconds and saves you from reprinting labels.
Battery management depends on your model. For rechargeable units, don't let them sit dead for months—this kills lithium batteries. I charge mine to about 50% before storing. Alkaline battery models? Remove the batteries if you won't use the device for more than a month to prevent corrosion.
Smart label makers benefit from firmware updates, which often add new templates, fonts, or connectivity features. Check the manufacturer's app quarterly—these updates can make your older device feel brand new.
Label Design and Application Tips
Good label design is about clarity, not creativity. Stick to fonts that are at least 12pt for standard labels. Anything smaller gets hard to read from a distance. High contrast is essential—black on white or white on clear backgrounds work best. I've tested colored labels extensively, and while they look nice, dark blue on light blue is practically invisible under certain lighting.
Surface preparation is crucial. Wipe down surfaces with isopropyl alcohol before applying labels. Dust and oils prevent adhesion. For textured surfaces like fabric bins, press firmly for 10-15 seconds to ensure proper contact. Cold surfaces need warming to room temperature first—labels won't stick to items fresh from a cold garage.
When removing old labels, heat is your friend. A hairdryer on low for 10-15 seconds softens the adhesive. Peel slowly at a 45-degree angle. For stubborn residue, use Goo Gone or rubbing alcohol, not your fingernails.
Building a Sustainable Labeling System
Create a labeling template document before you print anything. Decide on naming conventions, font choices, and label sizes for different applications. File folders get one style, storage bins another, cable labels something else. This consistency looks professional and makes everything easier to find.
When should you replace your label maker? If it still prints clearly and meets your needs, keep it. Upgrade when you find yourself fighting limitations—like needing wireless printing, wider tape widths, or barcode capabilities. The desire for new features should drive upgrades, not arbitrary timelines.
Common Label Maker Mistakes to Avoid
I've made every one of these mistakes, and I've watched countless home office setups go from "organized" to "chaotic mess with labels" because of them. Let me save you some wasted tape and frustration.
The Over-Labeling Trap
The biggest mistake? Labeling absolutely everything. I once labeled a drawer "Paper Clips" that contained nothing but paper clips in clear view. When every single item has a label, your eye can't distinguish what's actually important. Label categories and zones, not individual obvious items. Your
Check Price on Amazon →
system needs labels for “Tax Documents 2026” or “Client Contracts,” not “Pens.”
Font Size Reality Check
Here's a simple test: stand at your desk chair and try reading a label across the room. Can't see it? Your font is too small. I recommend 18-point minimum for shelf labels you'll view from 3-4 feet away, and 24-point for anything farther. Those tiny 9-point labels might look neat up close, but they're useless when you're actually working.
The Consistency Problem
Switching between "Q1-2024," "2026 Quarter 1," and "Jan-Mar 2026" on different boxes creates mental friction every time you search for something. Pick one format and stick with it across your entire office. Same goes for capitalization—either go ALL CAPS, Title Case, or sentence case throughout. Your brain will thank you.
Wrong Tape for the Job
Standard paper tape looks great on cardboard boxes but peels off plastic bins in a week. Laminated tape handles moisture but won't stick to textured surfaces. I learned this the hard way when all my garage storage labels curled off during summer humidity. Match your tape to the environment: laminated for anywhere near water or outdoors, strong adhesive for textured surfaces, and clear tape for a professional look on dark materials.
Placement Matters More Than You Think
Once a label's down, it's down. I've repositioned crooked labels and ended up with sticky residue and wrinkled tape. Before you press, consider: Will this surface slide in and out? Is this spot visible from my working position? Will another item block this label? Take five seconds to plan. Pro tip: for removable storage, label the front edge where it's always visible, not the top.
Durability Isn't Optional
Water-resistant labels aren't just for bathrooms. Coffee spills, humid days, and cleaning spray can destroy standard labels. If you're labeling anything you might wipe down, spend the extra few cents on laminated tape.
Feature Overload
You don't need 47 fonts, borders, and symbols for a home office. These features slow you down and create visual inconsistency. Find a clean sans-serif font you like and maybe one accent option—done. The best labeling system is the one you'll actually use, not the one with the most bells and whistles.
Document Your System
This sounds corporate, but hear me out. Take a photo of your filing system labels or keep a simple text file listing your categories. When you add something new six months later, you'll remember whether you used "Invoices" or "Bills" as your category name. Future you will appreciate present you's documentation.
Frequently Asked Questions
What's the difference between thermal and ink-based label makers?
Thermal label makers use heat-sensitive tape (no ink cartridges needed), making them more cost-effective for ongoing use. Thermal labels can fade over time with UV exposure or heat; ink-based labels are more permanent. Most home office label makers are thermal due to lower operating costs and sufficient durability for indoor use. Ink-based models better for outdoor labels or extreme temperature environments.
Can label maker tape damage furniture or equipment?
Most label maker adhesives are designed for clean removal from hard surfaces like plastic, metal, and laminated wood. Use caution on painted walls, unfinished wood, or fabric surfaces where adhesive may leave residue. Test on an inconspicuous area first for valuable or delicate items. Special low-tack or removable tapes available for temporary labeling needs. Rubbing alcohol or adhesive remover can clean most residue if needed.
Are smartphone-connected label makers worth the extra cost?
Worth it if you want custom fonts, graphics, logos, or frequently create similar labels (templates). App-connected models offer easier label design with touch interfaces vs. tiny keyboards. Integration with contacts or spreadsheets for batch printing (address labels, inventory). Basic handheld models sufficient if you only need simple text labels for organization. Consider how often you'll label and complexity of your needs before paying premium.
How much does label tape cost, and how long does it last?
Standard tape cartridges range from $8-20 depending on width and specialty type. A typical 1/2-inch tape cartridge prints approximately 26 feet of labels. Average home office user might go through 2-4 cartridges per year depending on organization projects. Generic/third-party tapes available at 30-50% savings but may affect print quality. Specialty tapes (metallic, fabric, strong adhesive) cost 20-40% more than standard.
What label width should I get for home office organization?
1/2-inch (12mm) tape is the most versatile for general home office labeling needs. 1/4-inch (6mm) works for cable labels and small items where space is limited. 3/4-inch to 1-inch (18-24mm) better for storage bins, file boxes, and labels viewed from distance. Many label makers accept multiple tape widths – check compatibility before buying tape. Start with 1/2-inch and add other sizes as you identify specific needs.