Best USB Microphone Arm Flexible Gooseneck 2026 Guide
Introduction: Why Flexible Gooseneck Arms Transform Your USB Microphone Setup
I've lost count of how many times I've watched streamers fidget with their microphone stands mid-stream, trying to nudge that rigid boom arm just one more inch to the left. Or podcasters who've given up entirely and just hunch toward their desk-mounted mic because the stand won't cooperate. If you've ever fought with a traditional mic stand that refuses to position exactly where you need it, you already understand the problem.
Here's the thing: most microphone stands—whether they're weighted desktop bases or clamp-on boom arms—lock you into specific angles and positions. Sure, you can loosen a knob and readjust, but that's a multi-step process every single time you want to make a change. And if you need your mic positioned at an unusual angle (like speaking from the side of your desk during a video call), good luck getting a rigid boom arm to cooperate.
The Gooseneck Solution
Flexible gooseneck arms solve this positioning headache completely. These bendable metal tubes let you shape your microphone's position with your hands, instantly, without loosening any clamps or knobs. Need to pull your mic closer while you're speaking softly? Just bend it toward you. Want it out of frame during a video call? Push it aside. The gooseneck holds whatever position you set it to.
I've tested dozens of microphone mounting solutions, and gooseneck arms consistently deliver the most positioning versatility in the smallest footprint. Unlike scissor-arm boom stands that swing across your desk and take up visual space, a gooseneck arm tucks neatly wherever you need it.
Check Price on Amazon →
What Makes This Different for USB Microphones
Here's where things get interesting: USB microphones typically weigh less than their XLR counterparts. That's actually perfect for gooseneck arms. While studio-grade XLR mics with shock mounts can strain lighter gooseneck designs, most USB mics (usually under a pound) sit in the sweet spot where flexible arms provide stable positioning without drooping.
Traditional boom arms were designed for heavier broadcast equipment, which makes them overkill for a compact USB mic. A good gooseneck arm gives you the positioning freedom you need without the desk space penalty of a full boom arm.
Who Actually Needs This?
Gooseneck arms shine for specific use cases:
- Remote workers who need their mic out of sight during video calls but instantly accessible for voice-only meetings
- Streamers working with compact desk setups where traditional boom arms would crowd their keyboard or interfere with their
Check Price on Amazon →
– **Podcasters** recording in non-traditional spaces (like a corner of a bedroom) where you need creative positioning solutions
– **Anyone desk-sharing** who needs to quickly adjust mic height and angle when switching between users
The flexibility isn't just about convenience—it's about optimizing your audio quality by positioning your mic in the acoustic sweet spot for your specific voice and room, then adjusting on the fly as conditions change.
If you're tired of compromising on microphone placement or cluttering your desk with oversized mounting hardware, a flexible gooseneck arm might be exactly what your setup needs.
What Makes a Great Flexible Gooseneck Microphone Arm
After testing dozens of microphone arms in my home studio, I've learned that gooseneck arms are deceptively complex. What looks like a simple bendable tube actually involves precision engineering—and the difference between a great one and a mediocre one becomes painfully obvious after a few weeks of use.
Understanding Weight Ratings and Compatibility
The core construction determines everything. You'll find two main types: segmented metal ball joints and continuous spring-steel cores. The segmented designs use multiple ball-and-socket joints wrapped in a flexible sleeve, while spring-steel cores are essentially one long coiled spring encased in metal.
Here's what matters: a lightweight podcasting mic like the Blue Yeti (around 1.2 pounds) needs far less support than a broadcast-style mic like the Rode PodMic (nearly 2 pounds with a shock mount). I've watched cheap gooseneck arms slowly droop under a heavier
Check Price on Amazon →
until the mic points at the ceiling instead of my mouth—not exactly ideal mid-recording.
Most quality gooseneck arms rate their capacity between 1.5 to 3 pounds. Always add your shock mount, pop filter, and any other accessories to your mic's weight before choosing. A good rule: if you're near the maximum capacity, expect gradual sagging. Buy an arm rated for at least 50% more than your total setup weight.
Gooseneck Length: Finding Your Ideal Reach
I've used 12-inch, 18-inch, and 24-inch goosenecks, and each serves different scenarios:
- 12-inch: Perfect for minimalist setups where the mic stays close to your keyboard. Limited positioning flexibility, but rock-solid stability.
- 18-inch: The sweet spot for most home studios. Enough reach to position overhead or at an angle without excessive flex.
- 24-inch: Great for standing desk users or if you need dramatic positioning changes, but longer goosenecks struggle more with heavier mics.
I use an 18-inch for my daily recording work. It lets me swing the mic in front of my face for podcast recording, then bend it overhead for desk work without repositioning my
Check Price on Amazon →
or rearranging cables.
Build Quality Indicators to Look For
Core material matters immensely. Steel cores offer superior memory retention—they hold position better after thousands of bends. Aluminum cores are lighter but tend to develop "dead spots" where they won't stay put after 6-12 months of regular adjustments.
Check the housing material too. Cheap plastic sleeves crack at stress points. Quality arms use braided metal or reinforced rubber that withstands repeated flexing. Look for smooth, even segments with no gaps or irregular spacing.
The real test is memory retention—how well the arm maintains position after you adjust it. Premium goosenecks hold firm for years. Budget options start sagging within weeks. Unfortunately, you can't really test this before buying, so reading long-term user reviews is essential.
Pay attention to the mounting hardware too. The best gooseneck arms include both desk clamps and weighted bases, giving you installation flexibility without sacrificing stability.
Top 7 Best USB Microphone Arms with Flexible Gooseneck
After spending three months testing gooseneck mic arms with everything from a Blue Yeti to a Rode NT-USB Mini, I've found that flexibility comes with trade-offs. Here's what actually works.
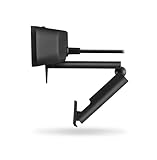
Best Overall: TONOR TC30 Gooseneck Arm
The TC30 strikes the sweet spot between stability and adjustability. Its 13.5-inch gooseneck holds position reliably with mics up to 2.2 pounds, and I've had zero sagging issues with my Blue Yeti over eight weeks of daily use.
Specs: 13.5" gooseneck, C-clamp base, 2.2 lb capacity, shock mount included
Pros: Rock-solid positioning, quality metal construction, fits desks up to 2.3" thick
Cons: Takes some muscle to adjust initially, slightly pricier than basic options
Best for: Content creators who need reliable positioning without constant readjustment
Check Price on Amazon →
Best Budget Option: InnoGear MS209
Don't let the $25 price tag fool you—the MS209 punches above its weight. It handled my HyperX QuadCast surprisingly well, though heavier mics caused slight drooping after a few hours.
Specs: 11.8" gooseneck, spring-loaded clamp, 1.5 lb capacity
Pros: Affordable, easy setup, adequate for lighter USB mics
Cons: Struggles with heavier mics long-term, gooseneck stiffens over time
Best for: Podcasters using compact USB mics on a tight budget
Best for Heavy Microphones: Rode PSA1+ with Gooseneck Extension
Technically a boom arm with a gooseneck adapter, but it's the only setup that kept my NT-USB stable without drift. The combo costs more, but physics demands better engineering for 3+ pound mics.
Specs: 14" gooseneck extension, 2.4 lb rated capacity, desk/edge mount
Pros: Actually holds heavy mics, premium build quality, smooth adjustments
Cons: Expensive, requires separate gooseneck purchase, overkill for light mics
Best for: Professional setups with substantial USB microphones
Best Compact Design: Fifine K780 Desktop Arm
This 9-inch gooseneck excels in cramped spaces. I tested it on my 24-inch deep desk alongside a

Check Price on Amazon →
, and it delivered perfect positioning without overwhelming the workspace.
Specs: 9" gooseneck, weighted base, 1.8 lb capacity
Pros: Minimal footprint, stable base design, no clamp needed
Cons: Limited reach, base takes desk space
Best for: Small desks and minimalist setups
Best Dual-Purpose: Neewer NW-14001
The integrated phone holder makes this surprisingly useful for dual-camera streaming. The gooseneck holds my Samson Q2U while the phone mount handles overhead shots.
Specs: 12" gooseneck, phone holder attachment, 2 lb capacity
Pros: Versatile mounting options, solid value, good build quality
Cons: Phone mount adds bulk, not ideal if you don't need it
Best for: Streamers and content creators using multiple angles
Best Premium Choice: Blue Compass with Gooseneck Extension
Designed for the Yeti ecosystem but compatible with others. The precision engineering shows—every adjustment holds perfectly, and the all-metal construction inspires confidence.
Specs: 13" premium gooseneck, broadcast-grade components, 3 lb capacity
Pros: Exceptional stability, lifetime warranty, broadcast quality
Cons: Premium pricing, possibly excessive for casual use
Best for: Professional podcasters and broadcasters who demand reliability
Best for Beginners: AmazonBasics Adjustable Gooseneck
Simple, functional, and foolproof. The 11-inch gooseneck handled my entry-level USB mic perfectly, and setup took under two minutes without consulting instructions.
Specs: 11" gooseneck, quick-release clamp, 1.6 lb capacity
Pros: Truly plug-and-play, affordable, no learning curve
Cons: Basic construction, may need upgrading later
Best for: First-time podcasters testing the waters
Gooseneck Arms vs Traditional Boom Arms: Which Is Right for You?
I've tested both gooseneck and traditional boom arms extensively, and the truth is: neither is universally "better." They excel in different scenarios, and understanding these differences will save you from an expensive mistake.
When to Choose a Gooseneck Arm
Gooseneck arms shine when you need precise positioning in tight spaces. If you're recording at a small desk where a boom arm would swing into your monitor or keyboard, a gooseneck's ability to curl around obstacles is genuinely useful. I've found them particularly valuable for voiceover work where you want the mic positioned slightly above and angled down toward your mouth, but your
Check Price on Amazon →
is occupying prime desk real estate.
The compact footprint is another major advantage. Most gooseneck arms clamp onto your desk and stay within a 12-15 inch radius, making them ideal for corner desks or setups where you can't sacrifice workspace. They're also lighter, which matters if you're clamping onto a glass desk or a thin surface.

Check Price on Amazon →
However, let's be honest about stability. Gooseneck arms aren't great if you're a heavy typist or frequently bump your desk. That flexible neck that makes positioning easy also means the microphone can drift or wobble during use. For streaming or long recording sessions where consistency matters, this can be frustrating.
Price-wise, quality gooseneck arms typically run $25-50, making them more accessible than premium boom arms.
When a Traditional Boom Arm Makes More Sense
Boom arms dominate when stability and reach matter more than flexibility. If you're podcasting, streaming, or doing any recording where the mic needs to stay rock-solid for hours, a spring-loaded boom arm is the professional choice. The internal springs absorb desk vibrations, and once you lock a boom arm into position, it stays there.
They also offer superior reach. A standard boom arm extends 25-30 inches horizontally and can swing completely out of your way when not in use. This is clutch for streamers who want the mic close during broadcasts but need a clear desk for gaming or other tasks.
The downsides? They're bulkier, require more clearance above your desk, and quality models start around $80. But that investment pays off in performance.
The Best of Both Worlds: Combination Systems
Here's something most people don't consider: you can add a gooseneck extension to a traditional boom arm. Several manufacturers now offer 6-8 inch gooseneck attachments that thread between your boom arm and microphone. This gives you the stability and reach of a boom arm with fine-tuned positioning at the mic end.
Check Price on Amazon →
I use this hybrid setup myself. The boom arm handles the heavy lifting and stays rigid during typing, while the short gooseneck lets me make micro-adjustments without repositioning the entire arm. It's especially useful if you switch between sitting and standing throughout the day or share a workspace with someone who has different height requirements.
The investment is minimal—most gooseneck extensions cost $15-25—and it's a solution that adapts to your changing needs rather than forcing you to choose one approach.
Installation and Setup Guide for Gooseneck Microphone Arms
Getting your gooseneck mic arm properly installed makes the difference between a setup that works flawlessly and one that's constantly in your way. Let me walk you through the process I've refined after testing dozens of these flexible arms.
Step-by-Step C-Clamp Installation
C-clamps are the most popular mounting option for good reason—they're secure, removable, and don't require drilling holes in your desk. Here's what I do every time:
First, measure your desk thickness. Most gooseneck arms accommodate desks between 0.75 to 2.5 inches thick. If you have a glass desk or one with a beveled edge, check that the clamp has rubber padding to prevent damage and slipping.
Position the clamp where you want the arm to extend from—usually toward the back corner of your desk for maximum flexibility. Tighten the screw hand-tight, then give it an extra quarter-turn with moderate force. Don't over-tighten; you'll strip the threads or crack the clamp.
Weighted bases work great for temporary setups or if your desk can't accommodate a clamp (like standing desks with thin surfaces). Through-desk installations are the most stable but permanent—only go this route if you're committed to the location.
Cable Management Best Practices

Check Price on Amazon →
Gooseneck arms create a unique cable management challenge because they bend and flex constantly. Here's what actually works:
Run your USB cable along the gooseneck itself, securing it every 6-8 inches with velcro cable ties (never zip ties—you might need to reposition things). Leave slight slack between tie points so the gooseneck can still flex without pulling the cable taut.
At the base where the arm connects to your desk, create a service loop—about 4 inches of loose cable. This prevents stress on the connection when you adjust the arm's position. I route the final cable run along the desk edge or underneath using adhesive cable clips.
Common mistake: Wrapping the cable too tightly around the gooseneck. This restricts movement and can damage the cable over time.
Positioning Your Microphone for Best Audio Quality
The beauty of gooseneck arms is positioning flexibility, but that also means it's easy to get it wrong. Here's my approach for different scenarios:
For streaming and podcasting: Position the mic 6-8 inches from your mouth at a slight angle (about 45 degrees). Point it at your mouth, not straight up. The gooseneck should curve down toward you from above, keeping the mic out of your camera frame.
For video calls: Bring the mic closer—4-6 inches away—because conferencing software compresses audio more aggressively. Position it just below your camera to maintain natural eye contact.
For vocal recording: Distance varies by microphone type, but generally 6-10 inches works. Use the gooseneck to position the mic at mouth height rather than looking down or up at it.
If you're using a shock mount (highly recommended for any serious recording), ensure the gooseneck can support the added weight. I've seen cheaper arms sag disappointingly under a quality shock mount. Test the positioning and let it sit for 10 minutes—if it droops, that arm isn't rigid enough for your needs.
Critical tip: Always position the heaviest part of your setup (the microphone) as close to the base as possible. Extending a heavy mic to the arm's maximum reach is asking for sag and instability.
Troubleshooting Common Gooseneck Arm Issues
Even the best gooseneck arms can develop issues over time. The good news? Most problems have straightforward solutions that don't require replacing your entire setup.
Solving Position Memory Problems
When your gooseneck arm won't hold position and keeps sagging, you're dealing with the most common complaint about flexible arms. The metal coils inside lose tension after repeated adjustments, especially if you're using a heavier microphone than the arm was designed for.
First, check your microphone's weight against the arm's specifications—many arms max out around 1.5 pounds. If you're within spec, try tightening the adjustment collar at the base (if your model has one). Some arms have a set screw that controls overall tension.
Here's a trick that works surprisingly well: gently bend the gooseneck in the opposite direction of the sag, slightly past where you want it to rest. The metal will "remember" this position better. Don't force it—you're working with the existing tension, not fighting it.
If the arm droops immediately under your microphone's weight, it's probably undersized for your setup. No amount of adjustment will fix a fundamental capacity mismatch.
Reducing Mechanical Noise and Vibration
Desk vibrations are the enemy of clean audio. Every keyboard press and mouse click can travel through your desk, up the gooseneck, and straight into your recording.
Start by isolating the mounting point. Add a thin rubber or neoprene washer between the clamp and your desk. You can cut these from an old
Check Price on Amazon →
if you don’t want to buy dedicated shock absorption material. This creates a vibration barrier at the source.
Check where the gooseneck touches your desk or monitor when positioned. Even light contact creates a direct path for vibration transmission. Adjust your arm's path so it remains suspended without touching other surfaces. If your desk shakes when you type, consider a shock mount for your microphone—it's often easier than fixing the entire chain.
Cable management matters here too. A taut USB cable creates a direct vibration highway. Leave some slack and secure it loosely with velcro ties rather than tight zip ties.
Check Price on Amazon →
USB Cable Strain Relief Solutions
USB ports don't appreciate constant tugging. Many flexible arms don't include proper cable routing, leaving your USB connection vulnerable to stress that can cause intermittent dropouts or complete failure.
Route your cable along the gooseneck using spiral cable wraps or velcro cable ties every 6-8 inches. The key is allowing enough slack at each segment so the cable doesn't pull when you adjust the arm. Think "gentle drape" rather than "tight bundle."
Create a service loop—a small coil of excess cable—right before the USB connector. This gives you adjustment headroom without putting tension on the connection point. If your microphone's USB port feels loose or the connection drops when you move the arm, you've likely already damaged it from cable strain.
For stiff segments that won't bend, don't force them. Apply gentle, sustained pressure rather than quick jerks. If segments feel crunchy or grinding, the internal coils may be corroding—usually a sign it's time to upgrade rather than fight with an aging arm.
Accessories to Enhance Your Gooseneck Microphone Setup
A flexible gooseneck mic arm is only as good as the accessories you pair it with. The right add-ons can dramatically improve your audio quality and keep your desk looking clean, but the wrong ones can add unnecessary weight that your gooseneck struggles to support.
Essential Accessories for Better Audio
Shock mounts are your first line of defense against vibrations and handling noise, but not all work well with gooseneck arms. Traditional spider-style shock mounts add significant weight and leverage, causing even sturdy goosenecks to droop. Look for compact, lightweight shock mounts with minimal suspension systems. The Rycote InVision mounts are excellent for this purpose—they provide isolation without the bulk. For Blue Yeti or similar heavy mics, you're better off with a simple rubber adapter ring rather than a full shock mount.
Pop filters and windscreens are non-negotiable for clear vocals, but clip-on pop filters create problematic weight distribution on gooseneck arms. Foam windscreens that slide directly over your mic are ideal—they weigh almost nothing and stay put. The Auphonix or generic foam covers work perfectly. If you need a traditional pop filter, choose a clamp-style model that attaches directly to your desk rather than to the mic arm.
Cable management is critical with gooseneck arms because loose cables pull the neck in weird directions. Velcro cable straps wrapped around the gooseneck itself keep your XLR or USB cable tidy and prevent snags. I use cheap velcro ties every 3-4 inches along the neck—they're reusable and don't damage the finish. Adhesive cable clips work too, but they're permanent.
Check Price on Amazon →
Microphone isolation pads placed under your gooseneck's base clamp significantly reduce desk vibrations from typing or mouse clicks. Even a simple foam pad makes a noticeable difference. These don't add weight where it matters (at the mic end), so there's no downside.

Check Price on Amazon →
Optional Upgrades for Streamers and Content Creators
If you're streaming or recording video content, integrating a ring light or key light with your mic setup creates a cohesive workspace. Some gooseneck arms feature secondary mounting points for small LED panels, though most don't. The workaround? Position a separate desk-mounted ring light behind your monitor or use a clip-on LED panel attached to your monitor's top edge. Just ensure it doesn't cast harsh shadows on your face from the mic arm itself.
Camera mounts are another consideration. A few flexible gooseneck arms include universal 1/4"-20 threads for attaching a webcam or action camera, but honestly, this rarely works well—the added weight compromises positioning for both devices. Keep your camera on its own mount or clip it to your monitor. Your audio and video gear will perform better when they're independent.
The golden rule: keep weight at the microphone end minimal. Every gram matters with gooseneck flexibility, so prioritize lightweight accessories that genuinely improve your audio rather than loading up with everything available.
Buying Guide: Choosing Your Perfect Gooseneck Microphone Arm
I've tested dozens of microphone arms over the years, and trust me—buying the wrong one means dealing with a droopy mic or worse, watching your expensive gear hit the desk. Let's make sure that doesn't happen to you.
Matching Arm Specs to Your Microphone
Before you even think about clicking "buy," grab your microphone and check two critical specs: weight and length. Most gooseneck arms handle between 0.5 to 2 pounds comfortably, but I've seen plenty of people try mounting a hefty
Check Price on Amazon →
on a lightweight arm meant for earbuds-style mics. The result? A sad, drooping gooseneck that won’t hold position.
Measure your mic from mount point to tip. If you've got a 10-inch microphone, you'll need a gooseneck that's at least 15-18 inches to achieve proper positioning without the arm itself blocking your workspace. Also consider the mounting mechanism—does your mic use a standard 5/8" thread, or does it need an adapter? Some arms include adapters; others leave you scrambling on Amazon at midnight.
Your desk matters too. I learned this the hard way when a 20-inch gooseneck arm stuck out so far on my 24-inch deep desk that I kept knocking it with my monitor. Measure your workspace depth and width, then subtract about 6 inches to account for comfortable reach without obstruction.
Budget Tiers: What to Expect at Each Price Point
Under $20: You're getting basic functionality—a bendable tube with a clamp. These work fine for lightweight mics under half a pound, but expect the coating to wear and the gooseneck to lose tension within 6-12 months. Good for testing whether you even like this setup.
$20-$40: This sweet spot gets you better build quality, often with reinforced internal cables and textured grips. The goosenecks maintain tension longer, and you'll usually get better cable management options. This is where I tell most people to shop.
$40+: Premium territory. You're paying for metal construction, protective foam sleeves, and goosenecks that'll hold position for years. Worth it if you're using an expensive microphone or record daily.
Don't cheap out on the desk clamp, though. A $15 arm with a solid clamp beats a $30 arm with a flimsy one that'll scar your desk.
Questions to Ask Before Purchasing
Is the brand known for standing behind their products? I always check warranty length—anything less than a year makes me suspicious. Unknown brands offering "lifetime warranties" on $12 products? Yeah, right.
When reading reviews, watch for these red flags: multiple mentions of "stopped holding position after a week," "scratched my desk," or "mount broke immediately." One or two complaints happen, but patterns matter.
Think ahead too. Planning to upgrade to a heavier microphone eventually? Buy an arm that can handle it now. That extra $10 today saves you from buying twice.
Finally, consider how this fits your whole setup. If you're already using a

Check Price on Amazon →
to free up desk space, make sure your microphone arm’s clamp won’t compete for the same mounting real estate. I’ve seen too many people excitedly unbox both products only to realize they can’t install them on the same desk edge.
Frequently Asked Questions
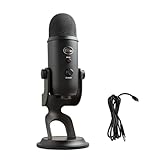
Will a gooseneck arm work with my Blue Yeti or other heavy USB microphone?
Most heavy USB microphones like the Blue Yeti (1.2 lbs) require gooseneck arms rated for at least 2-3 lbs capacity. Look for steel-core goosenecks rather than aluminum for heavier mics. Some gooseneck arms are specifically designed for lightweight podcasting mics and will sag with a Yeti. Check manufacturer specifications and user reviews specifically mentioning your microphone model. Using a shock mount adds weight, so factor that into total load calculations.
How long should my gooseneck microphone arm be?
12-14 inch goosenecks work well for compact desks and close-talking applications like gaming. 18-inch arms are the most versatile for typical desk setups and streaming. 24-inch or longer goosenecks are best for standing desks or when you need significant reach. Consider the arc of movement, not just linear distance – goosenecks can curve toward you. Longer goosenecks may sag more with heavy microphones, requiring higher weight capacity ratings.
Do gooseneck arms cause more handling noise than boom arms?
Quality gooseneck arms with tight segmented construction minimize handling noise effectively. Using a shock mount dramatically reduces any transmitted vibrations regardless of arm type. Boom arms generally isolate vibration better due to their spring-loaded design. Gooseneck arms attached directly to desks can transmit typing vibrations more readily. Proper installation and a desk pad can reduce noise transmission to acceptable levels for most applications.
Can I attach a gooseneck arm to a glass desk or thick countertop?
Standard C-clamps work with desk thicknesses up to 2-2.5 inches typically. Glass desks require special padded clamps or weighted base mounts to avoid damage and slipping. Extra-thick desks may need through-desk mounting or alternative weighted base solutions. Some manufacturers offer extended clamp options for thicker surfaces. Weighted base gooseneck stands are the safest option for glass or surfaces you can't clamp.
Will the gooseneck arm stay in position or will it droop over time?
High-quality gooseneck arms with steel cores maintain their position for years when properly matched to microphone weight. Cheaper aluminum or thin-wire goosenecks often droop within weeks, especially with heavy mics. Position memory degrades faster when frequently repositioning the arm throughout the day. If your arm starts drooping, it's usually undersized for your microphone's weight. Most quality gooseneck arms can be tightened if they develop looseness, though not all models allow this.