RGB Desk Setup Guide for Beginners 2026
Most people spend $300 on RGB gear and end up with a desk that looks like a broken disco ball. I've seen it dozens of times — mismatched lighting zones, three different apps fighting for control, and one rogue LED strip flickering at 2am. The frustration is real, and it's almost always caused by skipping the planning phase entirely.
I've reviewed and tested RGB products for years, including keyboards, monitors, mouse pads, LED strips, and ambient lighting systems. I've made every mistake in the book myself — bought incompatible ecosystems, underestimated power requirements, and once ran five different sync applications simultaneously until my PC basically staged a protest. That experience is exactly why this guide exists.
What you're about to read isn't a product shopping list dressed up as advice. It's a complete beginner's roadmap for building an RGB desk setup that actually looks intentional — the kind where people ask "how did you do that?" instead of "why is that one light purple?"
We'll start by reframing what RGB really is and why a well-executed setup genuinely improves your workspace beyond aesthetics. From there, you'll learn how to plan before spending a single dollar, which components deserve your budget first, and how to navigate the software side without losing your mind. A full section is dedicated to the mistakes beginners make most — because if you're reading this mid-build, one of those fixes might save your whole setup.
Whether you're starting from an empty desk or untangling an existing lighting mess, by the end you'll have a clear, confident path forward. Let's start with the thing most beginners get completely wrong.
What Is an RGB Desk Setup and Why It's More Than Just Pretty Lights
When I built my first RGB setup, I thought it was purely about looking cool on video calls. A few months of late-night work sessions later, I realized the ambient glow behind my monitor was genuinely reducing the eye fatigue I'd been blaming on bad sleep. That realization changed how I think about RGB entirely — and it's the first thing I want to recalibrate for you.
An RGB desk setup is the combination of color-programmable lighting elements across your workspace — keyboard backlighting, LED strips, monitor halos, ambient underglow — that work together to create a cohesive visual environment. The functional case for RGB is real: when your room is dark and your monitor is the only light source, the contrast between that bright screen and the surrounding darkness forces your pupils to constantly readjust. A soft bias light behind your monitor reduces that contrast, measurably lowering strain during long sessions. This isn't marketing fluff — it's basic visual ergonomics.
Addressable RGB vs. Standard RGB: Why This Distinction Matters for Beginners
This is the mistake I made with my first setup, and I want to save you the frustration.
Standard RGB (sometimes called "static RGB" or just "RGB") means the entire LED strip or component lights up as a single color. Want it red? It's all red. Every LED changes together, simultaneously. These are cheap, simple, and absolutely everywhere.
Addressable RGB (commonly abbreviated ARGB) means each individual LED can be controlled independently. This is what creates those flowing rainbow waves, reactive lighting effects that pulse to music, and the smooth color transitions you see in professional setups. The controller talks to each LED separately.
Why does this matter immediately? Cheap standard RGB strips — I bought a no-name set from a marketplace seller in my first attempt — produce laggy, inconsistent color shifts that look choppy and frankly cheap. I spent $35 thinking I'd gotten a deal. The effect looked like a broken traffic light. Addressable RGB costs a bit more upfront but is the foundation of every good-looking setup you've ever admired in a photo.
A practical starting point: look for WS2812B or SK6812 LED chips if you're buying raw strips. On pre-packaged products, the word "addressable" in the spec sheet is your signal. The price difference is usually $15–25 more for addressable — worth every cent.
Bias Lighting vs. Accent Lighting vs. Immersive RGB: Three Different Goals
Not all RGB in your setup serves the same purpose, and understanding this prevents you from over-buying or placing lights in the wrong spots.
- Bias lighting sits directly behind your monitor and projects light onto the wall behind it. Its job is purely ergonomic — reducing eye strain. A single

or LED strip behind your display handles this. Color temperature matters here more than color effects; warm white or soft neutral tones work best for extended work.
-
Accent lighting highlights specific areas of your desk — under the desk surface, beneath a shelf, or along a wall panel. This is decorative but intentional. It adds depth and visual interest without being distracting during focused work.
-
Immersive RGB is the full experience: synchronized keyboard, mouse, strips, and ambient lighting that all react together to games, music, or screen content. It's genuinely impressive when done well — and genuinely chaotic when done poorly.
You don't need all three simultaneously. Most beginners get the best results starting with bias lighting (functional, immediate payoff) and one accent layer, then deciding later whether immersive sync is worth the complexity.
What Realistic Results Look Like at a Beginner Budget
A clean, visually striking RGB setup is absolutely achievable between $150 and $300 — without purchasing everything at once. The brands that dominate in 2026 — Razer Chroma, Corsair iCUE, ASUS Aura Sync, and Govee — have matured well beyond simple color pickers. They now integrate with smart home platforms, react to Spotify and ambient screen color, and sync across dozens of device categories. Govee in particular has become the go-to for affordable addressable strips that punch above their price point.
The ecosystem is genuinely good right now. The learning curve is manageable. And the payoff — a workspace that's both more comfortable and more visually satisfying — is real.
Planning Your RGB Setup Before Buying a Single Product
The most expensive mistake beginners make isn't buying cheap LEDs — it's buying the right LEDs for the wrong setup. Spend 30 minutes planning before you open a single browser tab, and you'll save yourself both money and frustration.
Start With Your Physical Space
Grab a tape measure before anything else. Measure your desk length, the gap between your monitor and the wall, and the distance from your desk edge to the nearest outlet. I can't count how many times someone has messaged me after buying LED strips for a "standard desk" only to discover their 72-inch surface needs about 18 inches more coverage than the kit provides. Most budget LED strip kits cover 6.5 feet (about 78 inches) — that sounds like plenty until you account for corners, wrap-around, and the inevitable cutting miscalculation.
While you're at it, note where your power outlets actually are. A full RGB desk setup typically needs 4 to 6 additional USB-A connections beyond what your computer provides — keyboard, mouse receiver, LED controllers, and a hub for overflow. A

positioned strategically on your desk can handle much of that load, but you need to plan for it rather than discover it at 11pm when nothing will turn on.
Sketch a simple zone map. Nothing fancy — a napkin works. Mark these five zones:
- Monitor backlight (bias lighting behind your screen)
- Desk surface (underglow or strip lighting along the desk edges)
- Keyboard and mouse area
- Floor or wall accents (if you want them)
- Any shelving or overhead elements
Knowing your zones upfront tells you exactly how many LED controllers, strips, and smart bulbs you're actually shopping for.
Picking Your Color Palette Before You Shop
Here's something nobody tells beginners: your color palette decision is more important than your brand decision. I've seen gorgeous setups built with $40 of budget LEDs because the person committed to a single hue — a deep blue or a warm amber — and everything felt cohesive. I've also seen $500 setups that look like a carnival because someone kept adding "just one more color."
Monochromatic builds (one hue, varied brightness and saturation) are dramatically easier to manage and look far more intentional. Pick something that complements your room: cool blues and purples work beautifully against dark walls, while warm whites and ambers read better in rooms with natural wood tones. A two-tone palette — say, purple with white accents — gives you flexibility without the headache.
Test your intended colors in your actual room lighting conditions before committing. I once ordered what looked like a rich teal online, only to discover it read as muddy green under my overhead warm-white bulbs. Most smart LED apps let you preview colors on your phone — do it while standing at your desk with your normal room lights on.
Single-Ecosystem vs. Multi-Brand Builds: Honest Pros and Cons in 2026
By 2026, the ecosystem wars have settled into a few dominant players — Razer Synapse, Corsair iCUE, and Govee Home on the peripheral and ambient sides respectively. Each works well within its own walls. The problem is the moment you cross those walls.
Single-ecosystem builds are genuinely easier. Everything syncs through one app, color matching is automatic, and reactive lighting effects actually work reliably. The downside is cost and selection — if you're all-in on Corsair, your desk mat and monitor light options narrow considerably.
Multi-brand builds give you more flexibility and often better value per component, but you're managing separate apps that don't communicate well. Desync issues — where your keyboard pulses red while your strips stay blue — are constant and mildly maddening. Third-party tools like OpenRGB have improved, but they're still not seamless.
My honest advice: Choose one ecosystem for your "active" RGB (keyboard, mouse,

if available), and use a second brand only for ambient or background lighting that runs independently on a fixed color. That hybrid approach gives you the best of both without the sync headaches.
How Room Ambient Light Affects Color Perception (and Why You Should Test Before Committing)
RGB lighting looks completely different at noon versus midnight. Colors that pop beautifully in a dark room can become almost invisible next to a bright window. Cool whites wash out pastel colors entirely in daylight; deep reds can look brown under warm overhead lighting.
The fix is simple but rarely done: test your target colors at multiple times of day before finalizing your palette. Most smart strips let you set a static color for free — run your chosen hue for two or three days before buying additional hardware. What survives both your dark-room gaming sessions and your afternoon work calls is your real palette.
Essential RGB Components: What to Buy First, Second, and Last
Most people starting their first RGB setup make the same mistake: they see a viral desk tour, fall in love with the glowing RAM sticks, and immediately start pricing out motherboards with ARGB headers. It costs hours of frustrated cable routing and produces almost zero visible impact on the actual desk experience. Save yourself the detour.
The sequence in which you add RGB components matters enormously — not just for your wallet, but for how much visual and practical payoff you get.
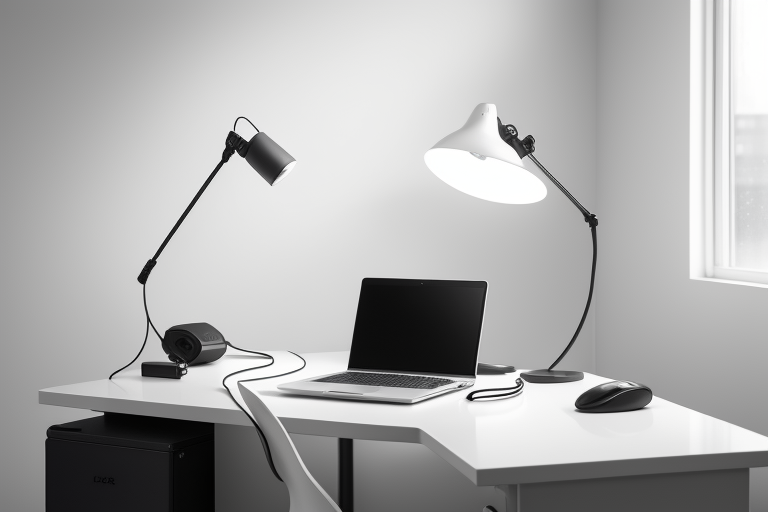
Monitor Backlights and Bias Lighting Bars: The Underrated Foundation
Buy this first. No contest.
Bias lighting — a strip of light mounted behind your monitor that casts a soft glow onto the wall — is the single highest-impact RGB purchase you can make for under $60. Philips Hue Play and Govee's immersion kits (around $35–55 in 2026) both do this well for beginners, with some options syncing to your screen content in real time.
The reason this comes first isn't aesthetic — it's physiological. The contrast between a bright screen and a dark surrounding wall is a primary driver of eye fatigue during long sessions. Bias lighting reduces that contrast gradient, making extended work and gaming sessions noticeably more comfortable. I started using a
setup a few years ago and genuinely can’t go back to a bare wall behind my monitor — the depth it adds to the perceived image is a real effect, not placebo.
For a 27-inch monitor, expect to spend $30–60. For an ultrawide, budget closer to $55–75 for full coverage.
RGB Keyboards for Beginners: Mechanical vs. Membrane and What the Lighting Difference Feels Like
Your keyboard is the thing you touch thousands of times a day. RGB here isn't just decoration — it becomes part of how the desk feels in use.
The lighting difference between mechanical and membrane keyboards is significant and worth understanding before you buy:
- Mechanical switches have individual housings per key, which means RGB shines through each keycap cleanly and consistently. Per-key lighting effects like reactive typing look crisp.
- Membrane keyboards diffuse light through a single layer, producing a muddier, less defined glow. Budget membrane boards under $40 often have visible hotspots.
For a beginner, I'd recommend starting in the $60–100 range with a tenkeyless (TKL)

— something like the Keychron K2 HE or Redragon K552. These deliver genuine per-key RGB without requiring any software expertise to look good out of the box.
Pair it with a matching mouse in the same ecosystem if budget allows — Logitech G, Razer, and SteelSeries all have software that lets keyboard and mouse sync lighting in 2026, which looks significantly more intentional than two unrelated RGB devices competing visually.
LED Strips, Light Bars, and Neon Rope: Understanding the Actual Differences
This category gets confusing fast because "LED strip" gets applied to three genuinely different products:
- Standard LED strips (like basic Govee or Phopollo tape strips): Flat, inexpensive ($15–30), great for under-desk or back-of-desk runs. Lower diffusion means you can sometimes see individual LED points on cheaper options.
- Light bars (like the Elgato Key Light Bar or BenQ ScreenBar Halo): Rigid, purpose-built, often with practical white light capability plus RGB ambiance. More expensive ($80–150) but cleaner installation.
- Neon rope (like the Govee Neon Rope or LIFX Beam): Silicone-diffused LED rope that produces smooth, continuous color without visible dots. The 2026 standard for wall accents and desk perimeter lighting. Expect to spend $40–80 for a beginner-length run.
For most beginners, prioritize neon rope or a light bar over standard strips. The diffused look is more polished and forgiving of imperfect mounting.
What to Skip Buying First
RGB RAM, GPU shroud lighting, and ARGB motherboard headers are last-tier additions — not because they don't look cool in photos, but because they're invisible during actual use. Your case is sitting on or under a desk. Nobody sees your GPU while they're working.
Quick budget breakdown:
- $250 starter build: Govee bias kit ($45) + TKL mechanical keyboard ($75) + budget RGB mouse ($35) + Govee Neon Rope 10ft ($55) + desk mat ($40)
- $500 enthusiast build: Philips Hue Play ($85) + Keychron K2 HE ($100) + Logitech G Pro X Superlight 2 ($80) + Elgato Key Light Bar ($130) + premium desk mat ($60) + LIFX Beam segment ($45)
Buy in this order, and every dollar will be visibly earning its keep from day one.
Setting Up Your RGB Lighting: Step-by-Step Installation Guide
This is where most setups either come together beautifully or turn into a tangled, half-lit mess you'll be redoing six months later. I've installed RGB strips on probably 30+ desks at this point — my own, friends', a few small office builds — and the difference between a clean install and a chaotic one almost always comes down to decisions made in the first 20 minutes.
Under-Desk RGB Strip Routing: The Cleanest Method I've Found After Dozens of Installs
Let's start with the most common failure point: adhesive backing. Every RGB strip kit ships with 3M tape, and that tape works great on smooth painted wood. It does not work on powder-coated steel frames, textured MDF surfaces, or any desk that's been wiped down with a cleaning spray — the residue destroys adhesion. I learned this the hard way when an entire 2-meter run of strip lighting peeled off my steel-framed standing desk three weeks after install, taking a small chunk of the finish with it.
The fix is simple: VHB (Very High Bond) mounting tape — 3M's 4910 series is what I use now. It's overkill for smooth surfaces but essential for anything textured or metallic. Before applying anything, wipe the surface with isopropyl alcohol and let it dry completely. That 60 seconds of prep saves you a full reinstall.
Cable management is the step everyone skips and regrets. Before your strips are mounted and before anything is plugged in, run all your RGB cables behind desk panels, through cable channels, or along the underside frame. Once your monitors are up and your peripherals are in place, retrofitting cables is genuinely miserable work. Route first, mount second, power third.
For controller placement: tuck RGB hubs and controllers into an

raceway or under-desk tray, positioned near a power source but not buried where you can’t reach the reset button. You will need that reset button eventually.
First power-on checklist before launching any sync software:
- Confirm all strip connectors are fully seated (a half-inserted connector causes dim or dead zones)
- Check that no strip has a sharp bend — LEDs fail at kinks over time
- Verify the power adapter wattage matches or exceeds the strip's requirement
- Test with the controller's standalone mode first, before pairing to any software
Mounting Bias Lights on Ultrawide vs. Standard Monitors: Key Differences
Monitor bias lighting placement has a bigger impact on the final look than most beginners expect. The goal is to project a soft glow onto the wall behind the monitor — for that to work, you need 15–20cm of clearance between the back of your monitor and the wall. Less than that and you get a harsh, defined hotspot instead of a bloom.
For standard 16:9 monitors, mounting the strip centered on the back panel works well. For ultrawide monitors (34 inches and above), a single centered strip often leaves the corners dark and creates uneven color wash. A perimeter mount works better on ultrawides — strip running along three sides of the back panel, not just the center horizontal. It takes more strip length but the result looks intentional rather than accidental.
On ultrawides, also watch the color temperature. A warm white bias light on a wide monitor makes the perceived screen color noticeably cooler by contrast. Start with a neutral white (around 6500K) and adjust from there.
Dealing With Corner Desks and L-Shaped Setups: Where Strips Usually Fail
Corner and L-shaped desks are where RGB installations get complicated fast. The inside corner of an L-desk is a dead zone — strips terminate there awkwardly, connectors bunch up, and the lighting transition looks choppy.
The cleanest approach is to treat each desk surface as a separate lighting zone rather than trying to run one continuous strip around the corner. Use individual strips per section, connect them to the same controller channel if you want synchronized color, but don't force a physical connection through the corner joint. That joint flexes slightly whenever you adjust the desk position and will eventually break a solder point or connector.
On the monitor side of an L-desk, bias lighting on a secondary monitor should be dimmer than your primary — roughly 70% brightness — so your eye naturally prioritizes the main screen without the secondary display's backglow creating visual competition.
Get these fundamentals right before touching any software, and the rest of the setup process becomes genuinely straightforward.
RGB Sync Software: How to Actually Control Your Lighting in 2026
Here's the part nobody warns you about: once you've got all your RGB hardware installed, you're going to open three different software apps, get confused about why your keyboard isn't talking to your mousepad, and spend 45 minutes Googling why your RAM is doing something completely different from everything else. The good news is the software ecosystem has matured significantly. The bad news is it's still fragmented. Here's how to navigate it without losing your mind.
The Major Platforms: What You're Actually Working With
Corsair iCUE 5 is the most polished all-in-one option if you're running an all-Corsair build. The layered effects system is genuinely powerful once you learn it, and the hardware lighting profiles (stored directly on your devices) are a lifesaver if you use your setup on multiple machines. The catch: iCUE has a well-documented memory leak issue that still surfaces in 2026, especially with large device counts. If your PC starts slowing down after a few hours, check Task Manager — iCUE might be sitting at 800MB+ of RAM. The fix is usually disabling the hardware monitoring dashboard under Settings, which is resource-hungry and mostly unnecessary.
Razer Synapse 4 is cleaner and faster than its predecessor, and the Chroma Studio lighting editor is genuinely intuitive for beginners. Where it struggles is with non-Razer devices — support outside the Razer ecosystem is limited.
ASUS Aura Creator is essential if your motherboard has ASUS headers, but has a notorious conflict with third-party RAM. If your
Similar Posts
Wireless Headphones for Office Work Noise Canceling Guide
Why Noise-Canceling Wireless Headphones Are Essential for Office Work If you’ve ever tried to concentrate while someone three desks over is having a loud phone call, you already know why noise-canceling headphones have become standard equipment for office workers. But understanding how they work—and whether you actually need them—can save you money and frustration. How…
Best Drawing Tablets for Artists Under $300 (2026)
Three years ago, I made a $400 mistake. I bought a large-format display tablet because I assumed bigger and more expensive meant better for my workflow — and spent the next six months fighting wrist fatigue, a cluttered desk, and a learning curve that nearly killed my motivation to draw digitally at all. Here's what…