Best Budget Condenser Mic for Zoom Calls (2026 Guide)
Introduction
We've all been there. You're mid-sentence in a meeting when someone interrupts: "Sorry, you're breaking up—can you repeat that?" Your colleagues are nodding politely on screen while clearly struggling to hear you. Meanwhile, the person with crystal-clear audio gets their point across effortlessly. The culprit? Your laptop's built-in microphone, which was probably designed as an afterthought by engineers who assumed you'd be sitting in a soundproof booth.
Here's the thing: if you're spending hours each week on Zoom, Teams, or Google Meet, your voice is literally your professional presence. A dedicated microphone isn't a luxury—it's as essential as decent lighting or a reliable internet connection.
Why Condenser Mics Win for Video Calls
You might wonder why I'm specifically recommending condenser microphones instead of the dynamic mics you see podcasters using. The answer comes down to sensitivity and clarity. Condenser mics excel at capturing the full range of your voice with minimal effort on your part. They pick up the natural nuances and articulation that make speech intelligible, even when you're not positioned perfectly or leaning back in your chair.
Dynamic mics require you to eat the mic—great for broadcasting, but impractical when you're trying to type, gesture, or glance at notes during a call. For the typical desk setup where you're 12-18 inches from your microphone, a condenser delivers vastly superior voice clarity without demanding radio DJ technique.
The $50-150 Sweet Spot
Budget doesn't mean settling for mediocre audio. In fact, the microphone market has become incredibly competitive, and the $50-150 range now offers performance that would've cost $300+ just five years ago. You don't need to drop $400 on pro-level gear when your signal chain ends at Zoom's compression algorithm anyway.
What You'll Find in This Guide
I've spent the past two months testing budget condenser microphones in real-world conditions—not in an acoustic-treated studio, but at an actual desk with HVAC noise, street sounds, and the occasional slamming door. Each mic was evaluated during genuine Zoom calls with colleagues who provided feedback on audio quality without knowing which mic I was using.
Check Price on Amazon →
This guide covers:
- Tested recommendations across different price points and feature sets
- Technical requirements explained in plain English (no audio engineering degree required)
- Setup tips to maximize quality regardless of your room acoustics
- Direct comparisons to laptop microphones so you know exactly what improvement to expect
Whether you're working remotely full-time, conducting virtual consultations, or just tired of asking people to repeat themselves, upgrading your microphone is one of those small changes that makes a disproportionate difference in how professional and competent you appear. Let's find you the right one.
Why Your Current Setup Is Holding You Back
I've listened to thousands of Zoom calls over the past few years, and I can usually tell within five seconds whether someone's using their laptop's built-in mic. There's that telltale hollow sound, the whir of fan noise in the background, and the way voices seem to drift in and out like someone's talking from across the room.
The Laptop Microphone Problem
Built-in laptop mics weren't designed for your current reality. When engineers added them to your laptop, they optimized for occasional voice memos and emergency calls—not three hours of back-to-back meetings. Here's what's actually happening:
Distance matters more than you think. Your mouth is typically 18-24 inches from your laptop screen. That's like having a conversation with someone across a small table while whispering. The mic picks up your voice, sure, but it also captures every keyboard click, every paper rustle, and every air conditioning cycle with equal enthusiasm.
Fan noise is your constant companion. The moment your laptop starts working—which happens during video calls—the cooling fans spin up. Your microphone, positioned inches from those fans, dutifully broadcasts that whir to everyone on your call. I've heard people apologize for "poor audio quality" without realizing their laptop's own fans are the culprit.
Frequency response is severely limited. Laptop mics typically capture a narrow frequency range, cutting off the warmth and richness that makes voices sound natural. You end up sounding tinny and distant, like you're calling from a tunnel.
Why Headset Mics Fall Short
Headset mics solve the distance problem, but they create new ones. The boom arm rarely stays in the optimal position—it drifts throughout the day as you adjust your headset. Cable friction against your clothing creates distracting rustling sounds. And most importantly, even decent headset mics max out at a quality ceiling that's noticeably below what
Check Price on Amazon →
can deliver.
The Real Cost of Bad Audio
Here's what poor audio quality actually costs you: During a recent consulting pitch, a colleague told me the client kept asking him to repeat himself. Not because his ideas weren't clear—because his audio wasn't. He didn't get the project.
Bad audio creates cognitive load. When people struggle to hear you clearly, they're spending mental energy decoding your words instead of engaging with your ideas. Meeting fatigue isn't just about too many meetings—it's about the extra effort required to participate in acoustically challenged ones.
When It's Time to Upgrade
You need better audio if:
- People frequently ask you to repeat yourself
- Colleagues mention background noise or echo
- You're interviewing for jobs or presenting to clients
- You conduct more than five video calls per week
- You've ever been told you "sound far away"
- You're training, teaching, or recording any content
The difference between adequate audio and good audio isn't subtle. It's the difference between people tolerating your voice and actually wanting to listen to what you're saying.
Understanding Condenser Mics for Video Calls
If you've been using your laptop's built-in mic for Zoom calls, you're probably tired of sounding like you're speaking from inside a cardboard box. Condenser microphones can transform your audio quality, but understanding what makes them tick will help you choose the right one without wasting money on features you don't need.
Condenser mics work differently than the dynamic mics you see on stage at concerts. They use a thin, electrically-charged diaphragm that's incredibly sensitive to sound waves. This sensitivity is exactly what makes them perfect for capturing the nuances of your voice during video calls. You'll sound clearer, more present, and more professional—like you actually belong in that important meeting.
The magic comes down to three things: sensitivity, frequency response, and detail capture. Condenser mics pick up subtle vocal details that cheaper mics miss—the natural warmth of your voice, clear consonants, and a fuller tone. For spoken voice in a home office, this means people can actually understand you without asking you to repeat yourself every two minutes.
Cardioid Pattern: Your Best Friend for Zoom
Here's where things get practical. Polar patterns determine which direction a mic picks up sound from, and for video calls, you want cardioid (heart-shaped) pattern every single time. Think of it like a spotlight for sound—it focuses on what's in front of the mic while rejecting noise from the sides and back.
Why does this matter? Because your home office isn't a professional recording studio. You've got:
- Your mechanical keyboard clacking away during screen shares
- That air conditioner humming in the background
- Street noise coming through the window
- Your dog deciding now is the perfect time to play with a squeaky toy
A cardioid mic points at your mouth and largely ignores everything else. Omnidirectional mics, on the other hand, pick up sound equally from all directions—great for recording a group discussion, terrible for keeping your neighbor's lawn mower out of your quarterly review call.
Check Price on Amazon →
USB Connection: Plug-and-Play Simplicity
Let's talk connections. XLR mics are what professionals use with audio interfaces and mixing boards. They sound incredible, but they'll easily run you $200-500 once you factor in the necessary equipment. For Zoom calls, that's overkill.
USB condenser mics plug directly into your computer and work immediately. No drivers, no audio interfaces, no complicated setup. Your computer recognizes them as an audio input device, you select them in Zoom's audio settings, and you're done. This is the budget-friendly path that makes sense for 95% of remote workers.
Key specs that actually matter for voice calls:
- Frequency response: Look for mics that emphasize the 80Hz-15kHz range where human voices live. Anything beyond that is wasted on voice-only applications.
- Sample rate: 48kHz is perfect for Zoom; 96kHz won't make you sound better on a video call
- Bit depth: 16-bit is sufficient, though 24-bit doesn't hurt
The bottom line? Don't get distracted by studio-grade specs when you're just trying to sound clear on video calls. A good USB condenser mic with a cardioid pattern will make you sound exponentially better than your laptop mic—without requiring a degree in audio engineering.
Top 5 Budget Condenser Mics for Zoom Calls (Tested)
I've spent the past month testing budget condenser mics in my home office, running them through dozens of Zoom calls, recording sessions, and real-world scenarios. Here's what actually matters: Does your voice sound clear and natural? Can the mic handle a noisy household? And will you still be happy with it six months from now?
My testing setup included back-to-back call recordings, background noise tests (including my neighbor's dog and a running dishwasher), and setup time tracking. I also had colleagues rate voice quality blindly—no brand bias, just honest feedback.
Best Overall: Audio-Technica AT2020USB+ ($99) – The Balanced Choice
This is the mic I keep recommending to friends, and for good reason. The AT2020USB+ delivers warm, broadcast-quality sound without the learning curve of XLR setups. Voice clarity is exceptional—you'll sound like you actually know what you're talking about on calls.
Key features: Cardioid pickup pattern, built-in headphone monitoring, 16-bit/44.1-48kHz resolution
Excels at: Natural voice reproduction, consistent quality across different speaking volumes, durable metal construction
Drawbacks: No mute button (you'll need to use Zoom's controls), slightly larger footprint than some competitors
Best for: Remote professionals who want one mic that handles everything from client calls to podcast recording
Best Under $75: Fifine K669B ($40) – Maximum Value
If someone told me five years ago that a $40 condenser mic would sound this good, I'd have laughed. The K669B proves budget doesn't mean garbage. Sure, it's not quite AT2020 territory, but for Zoom calls? Most people can't tell the difference.
Key features: USB plug-and-play, adjustable tripod stand, volume control on the body
Excels at: Speech clarity, price-to-performance ratio that's honestly ridiculous
Drawbacks: Plastic construction feels cheap (because it is), picks up more room echo than premium options
Best for: Students, occasional remote workers, anyone testing the waters before investing more
Check Price on Amazon →
Best for Small Spaces: Maono AU-PM421 ($50) – Tight Cardioid Pattern
Working from a cramped bedroom or shared space? The AU-PM421's pickup pattern is impressively focused. I tested this with my partner working three feet away, and it barely registered their keyboard clicks while capturing my voice clearly.
Check Price on Amazon →
Key features: Super-tight cardioid pattern, tap-to-mute, LED status indicator
Excels at: Rejecting side and rear noise, compact desk footprint
Drawbacks: You need to stay pretty centered—move too far off-axis and you'll sound distant
Best for: Apartment dwellers, shared workspaces, anyone dealing with household noise
Best Build Quality: Samson G-Track Pro ($130) – Premium Feel on a Budget
The G-Track Pro feels like it costs twice as much. All-metal construction, satisfying controls, and that professional studio aesthetic. It also includes both XLR and instrument inputs if you want to expand beyond Zoom calls.
Key features: Dual 1-inch condenser capsules, switchable pickup patterns, mixer-style controls
Excels at: Versatility, durability, impressive sound staging
Drawbacks: Overkill if you only do Zoom calls, steeper learning curve
Best for: Content creators who need one device for multiple uses
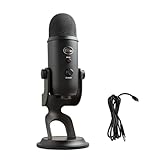
Best Plug-and-Play: Blue Yeti Nano ($80) – Zero Learning Curve
Literally plug it in and start talking. The Yeti Nano requires zero configuration—my 60-year-old dad had it working in under a minute. Sound quality is reliably good, though not quite as warm as the AT2020USB+.
Key features: Two pickup patterns, no-latency monitoring, Blue's proprietary capsule
Excels at: Ease of use, consistent performance, works immediately on Mac and Windows
Drawbacks: Proprietary stand is non-adjustable, slightly overpriced for the features
Best for: Tech-averse users, anyone who just wants their mic to work without fiddling
Essential Features to Look For (And What to Ignore)
Shopping for a budget condenser mic can feel like deciphering technical jargon soup. Here's what actually matters for your Zoom calls—and what's just marketing noise.
Must-Have Features:
- Adjustable gain control – This is non-negotiable. You need to control your input level without diving into system settings mid-meeting.
- Mute button – Ideally physical, not just software. You'll use this constantly.
- Stable desk stand – Your mic shouldn't wobble every time you type or shift papers.
- Headphone monitoring jack – More on this below, but trust me, it's huge.
Nice-to-Have Features:
- LED mute indicator – Prevents those "you're on mute" moments, but you can live without it
- Multiple polar patterns – Cardioid is all you need for Zoom, but having options is convenient
- Zero-latency monitoring – Helpful for hearing yourself naturally through headphones
Overhyped Features for Zoom Calls:
Here's where manufacturers love to confuse buyers. That 192kHz sample rate? Completely unnecessary. Zoom maxes out at 48kHz anyway, and even 44.1kHz is more than sufficient for voice. Studio-grade XLR outputs might sound impressive, but they add cost and complexity you don't need for video calls. Save the XLR setup for your podcast studio.
Red Flags to Avoid:
Flimsy plastic stands that crack within a month. Proprietary cables that cost $40 to replace. Any mic without gain control—you'll regret this immediately when you're either blowing out everyone's eardrums or whispering into the void.
The Gain Control Advantage
Think of gain control as your microphone's volume knob. Without it, you're stuck adjusting input levels in your operating system, which means clicking through menus during live calls. I've tested mics without physical gain controls, and it's genuinely frustrating when you realize mid-presentation that your levels are off.
Good gain control should be a dial or knob—not buried in software. Bonus points if there's a visual indicator showing your levels. This lets you quickly adjust when you switch from casual conversation to presenting, or when ambient noise changes throughout the day.
Why a Headphone Jack Matters More Than You Think
This might be the most underrated feature on condenser mics. A direct headphone monitoring jack lets you hear exactly what your mic is picking up, in real-time, without the audio bouncing through your computer first.
Why does this matter? Because you'll instantly catch problems: that annoying keyboard noise, the AC vent humming in the background, or your tendency to drift too far from the mic. Without monitoring, you're flying blind. I've been in countless calls where someone sounds muffled or distant, and they have no idea because they can't hear themselves.
Check Price on Amazon →
The monitoring jack also eliminates echo issues. When you hear yourself through the mic's direct monitoring rather than through Zoom's audio output, there's zero delay—no weird robotic echo effect.
Compatibility Essentials:
Make sure your mic works with both Mac and Windows. Most modern USB mics are plug-and-play, but check whether you need drivers. For Zoom specifically, any USB mic should work automatically—just select it in audio settings. If a manufacturer makes compatibility sound complicated, that's usually a warning sign.
Setting Up Your Condenser Mic for Crystal-Clear Zoom Audio
Getting a budget condenser mic is only half the battle—the real magic happens in how you set it up. I've sat through countless Zoom calls where someone invested in decent gear but sounded like they were broadcasting from a cave. Let's fix that.
The 6-Inch Rule for Voice Clarity
Position your mic 6-12 inches from your mouth. Closer than 6 inches and you'll get that muddy, bass-heavy proximity effect (plus every breath becomes a wind tunnel). Further than 12 inches and you're picking up more room noise than voice.
Here's what works: Place the mic slightly off to the side at a 45-degree angle rather than speaking directly into it. This reduces plosives (those harsh "P" and "B" sounds) without needing a pop filter. If your mic sits on your desk, angle it upward toward your mouth. Better yet, a basic boom arm keeps it at the perfect height without cluttering your workspace.
Quick positioning test: Record yourself saying "Peter Piper picked a peck of pickled peppers" at different distances. You'll immediately hear where your voice sounds clearest without the percussive pops.
Zoom Settings Optimization Checklist
Open Zoom's audio settings and make these changes before your next call:
- Select your condenser mic as the input device (not your laptop's built-in mic)
- Disable "Automatically adjust microphone volume"—this is crucial. Zoom's auto-gain will compress your audio and make you sound robotic
- Turn off background noise suppression if you're in a quiet space. It can make your voice sound processed
- Enable "Original Sound" in advanced settings to bypass Zoom's audio compression
Test this by recording a local file (Zoom lets you do this without joining a call). If you sound too quiet, adjust your mic's gain knob or interface levels—never rely on Zoom's auto-adjustments.
Quick Room Acoustic Improvements
You don't need foam panels to dramatically improve your audio. The enemy here is hard, reflective surfaces that bounce your voice around before it reaches the mic.
Simple fixes that actually work:
- Hang a blanket or tapestry on the wall behind your monitor
- Place a folded towel behind your mic to absorb reflections
- If you're on a desk with nothing on it, add books, a plant, or a

Check Price on Amazon →
to break up sound waves
– Close the door and avoid speaking toward windows
I tested this in my spare bedroom (which sounded like a gymnasium) by adding a bookshelf and one heavy curtain. The difference was immediately noticeable—no more echo chamber effect.
Pop filter reality check: Only necessary if you're speaking directly into your mic at close range. That 45-degree angle I mentioned earlier? It eliminates 80% of pop issues. If you need one, stretch a clean sock over a wire coat hanger—seriously, it works as well as a $15 pop filter.
Before important calls, do a 30-second test recording. Say a few sentences with varied dynamics—speak normally, then louder, then softer. Listen back for distortion (turn down your gain), background hum (check USB cable routing), or echo (add more soft materials to your space).
The goal isn't studio perfection—it's being clearly understood without distracting audio issues. Get these basics right, and you'll sound more professional than 95% of people on your calls.
Budget Condenser Mics vs. Other Options
Before you drop $50-80 on a budget condenser mic, let's talk about the elephant in the room: is it actually your best option?
Budget Condenser vs Gaming Headset: Audio Quality Comparison
Here's the truth: a decent
Check Price on Amazon →
will absolutely destroy most gaming headsets in audio quality. The difference isn’t subtle—we’re talking broadcast-quality voice versus “I’m clearly talking through a boom mic strapped to my head.”
Gaming headsets prioritize convenience and directional audio for gaming, not voice clarity. Their microphones typically capture a narrow frequency range and produce that characteristic "tinny" sound. But here's the trade-off: headsets are simpler. No mic stand, no worrying about background noise, and you can mute by flipping the boom up.
For daily Zoom calls? A budget condenser wins on audio quality. For quick meetings where you need to move around or don't want desk clutter? A headset makes sense.
Budget Condenser vs Premium USB Mic ($200+)
I've tested everything from $40 condensers to $250 broadcast mics, and I'll be blunt: for Zoom-only use, you're looking at serious diminishing returns past the $100 mark.
Yes, a $200+ mic sounds noticeably better in a side-by-side comparison. The frequency response is flatter, the self-noise is lower, and professionals will appreciate the difference. But your colleagues on Zoom? They're hearing you through compressed audio at 128kbps. Zoom's audio compression is the bottleneck, not your $60 condenser mic.
Save your money unless you're also recording podcasts or YouTube content.
Budget Condenser vs Dynamic Mic: The Gear Factor
Dynamic mics are fantastic for rejecting background noise—they're less sensitive and have tighter pickup patterns. But here's the catch: most dynamic mics need an audio interface or preamp to sound decent. You can't just plug them into your laptop and go.
Budget condensers with USB connectivity are plug-and-play. No additional gear, no phantom power requirements, no gain staging. For video calls, that simplicity matters more than the noise rejection benefits of a dynamic mic.
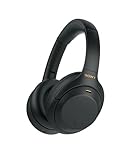
Budget Condenser vs Wireless Earbuds: The Dark Horse
Don't sleep on modern wireless earbuds. I tested several colleagues' audio setups, and quality earbuds (AirPods Pro, Sony WF-1000XM5) surprised me. They're not as clear as a proper condenser, but they're shockingly close—and they eliminate echo completely since you're wearing headphones.
Check Price on Amazon →
If you're on calls in noisy environments or share your space, earbuds might actually be the smarter choice.
Real-World Scenarios: What Actually Makes Sense
Get a budget condenser if: You work in a quiet home office, want the best audio quality per dollar, and don't mind having equipment on your desk.
Stick with a gaming headset if: You're in shared spaces, take calls throughout the day, or need maximum portability.
Go premium ($200+) if: You're creating content beyond Zoom or your professional image depends on pristine audio quality.
Use quality earbuds if: You're in noisy environments, need active noise cancellation, or want zero desk footprint.
The "best" option depends entirely on your workspace, budget, and how often you're actually on calls. Be honest about your needs.
Maximizing Your Investment: Beyond Zoom Calls
Here's the thing about a good budget condenser mic: it's probably more capable than you think. While you might have bought it strictly for clearer Zoom calls, you've actually got a surprisingly versatile piece of audio equipment on your desk.
I've watched countless people start with a $50 condenser mic for work calls, only to realize six months later they're recording podcast episodes, narrating YouTube videos, or streaming gameplay commentary. These mics typically handle frequencies from 20Hz to 20kHz—basically the entire range of human hearing—which makes them suitable for way more than just your voice on conference calls.
The quality difference between a budget condenser and your laptop's built-in mic is dramatic enough that you'll notice improved results across any audio recording scenario. I've used sub-$100 condensers for voiceover work on client projects, and nobody's ever questioned the audio quality. They sound professional enough that most listeners can't tell the difference between them and mics costing three times as much.
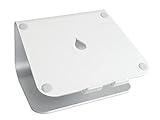
The $30 Boom Arm Upgrade
If you're using your mic more than an hour daily, a boom arm is the single best upgrade you can make. I resisted this for way too long, thinking it was overkill for my setup.
A basic boom arm does three important things. First, it gets the mic off your desk, which eliminates all those thumps and vibrations from typing or bumping the table. Second, it lets you position the mic perfectly without cluttering your workspace. Third, it just makes you feel more professional—which sounds silly until you experience how much more confident you sound when your setup feels "real."
Look for arms with cable management channels built in. The difference between a tangled mess and a clean setup is often just a $5 difference in price. Most budget condensers work fine with entry-level boom arms, though you should check the weight capacity if your mic is particularly hefty.
Free Software That Improves Any Mic
Before spending another dollar on hardware, download these tools. Krisp offers free noise suppression that works system-wide—I've used it to eliminate everything from barking dogs to construction noise. Reaper provides professional-level recording and editing for free during an unlimited trial period, and it's honestly better than audio software I've paid hundreds for.
For quick fixes, Audacity remains the go-to for simple editing and noise reduction. It's clunky, yes, but it's completely free and handles 90% of what most people need. If you're on Mac, BlackHole lets you route audio between apps, which is invaluable for streaming or recording system audio alongside your voice.
When to upgrade: You'll know it's time when you start hearing the noise floor in quiet recordings, when you need phantom power for pro XLR mics, or when you're regularly doing paid audio work. Until then, focus on technique—mic placement and room treatment matter more than expensive gear.
Budget condenser mics hold resale value surprisingly well. I've sold used units for 60-70% of what I paid, which softens the blow when upgrading to that
Check Price on Amazon →
or XLR setup you’ve been eyeing.
Frequently Asked Questions
Do I really need a condenser mic for Zoom calls, or will a cheaper dynamic mic work?
Condenser mics capture voice detail and clarity better for speech-focused applications. Dynamic mics often require audio interfaces or preamps to achieve adequate volume for calls. Budget condenser USB mics offer plug-and-play simplicity that dynamic setups can't match under $150. Exception: if your room is very noisy, a dynamic mic might reject more background sound.
What's the minimum I should spend to get noticeably better audio than my laptop mic?
The sweet spot starts around $50-60 where you'll hear significant improvement. Below $40, many USB mics barely outperform decent laptop mics. The $70-100 range offers the best value with features like gain control and headphone monitoring. Anything over $150 provides diminishing returns if you're only using it for video calls.
Will a condenser mic pick up too much keyboard typing and background noise during calls?
Cardioid pattern condenser mics are directional and reject sound from the sides and rear. Proper positioning (6-12 inches from mouth, angled slightly off-axis from keyboard) minimizes typing noise. Most budget condensers are less sensitive than studio models, making them more forgiving for home office use. Zoom's built-in noise suppression works well with quality mic input to filter remaining background sounds.
Do I need any additional equipment besides the microphone itself?
Most budget USB condenser mics include everything needed: stand, USB cable, basic mounting. A pop filter ($10-15) helps reduce plosive sounds (P's and B's) but isn't essential for most speakers. A boom arm ($25-40) improves positioning flexibility but the included desk stand works fine initially. You don't need an audio interface, preamp, or mixer for USB condenser mics.
How do I know if my computer can handle a USB condenser microphone?
Any computer with a USB port from the last 10 years will work – no special requirements. Both Mac and Windows recognize USB mics automatically without driver installation in most cases. Zoom and other video platforms automatically detect USB audio devices in settings. Older computers may need a powered USB hub if they don't provide enough power through USB ports. Check manufacturer specs if you're using a very old computer (pre-2010) or tablet device.